Hello there!
In the last post, I explained how I reverse-engineered an IR protocol and added my Electrolux AC to Home Assistant. But in this short post, I want to explain how I improved the distance and coverage of my IR transmitter.
I bought a pack of cheap IR Receivers and Transmitters from AliExpress. I haven’t checked the circuit or components, just connected to ESP32 and started to dump and send IR commands. The IR Receiver worked perfectly, but the IR Transmitter was too weak. I had to point directly to the AC so it could pick up the signal.
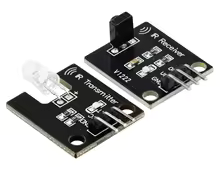
As you can see, the IR Transmitter has 3 pins: Ground, Vcc (+5 V), and Data. So, it is ok to expect this board to have a small transistor that works as a switch based on the signal from the Data pin. But unfortunately, the Vcc pin is not connected to anything at all. I guess it is a way to make the board cheaper. The IR LED is directly connected to Ground and Data. Which means it doesn’t use +5V, but instead it uses the voltage provided by the Data pin. In the case of ESP32, it is +3.3V. It is enough to make the IR Transmitter work, but the power of the IR is too low.
So, I decided to desolder the IR LED and build my own circuit using a transistor (2N2222) and a small 220 Ohm resistor. After this small modification, the power and reliability of my IR Remote in Home Assistant improved a lot. The IR Remote no longer needs to point directly at the AC; just pointing in the direction of the AC is enough. Now, I can place it in the back of the room, leave it constantly connected to a power source, and forget about it. It just works.